Video and Sound Production - Exercises
21/04/2026 - 21/07/2026 (Week 01 - Week 14)
PHANG QI YU / 0385732
Video and Sound Production VSP60104 / Bachelor of Design in Creative Media / Taylors University
Exercises
Table of Content
1. Lecture
2. Instructions
3. Process Work
➼ Framing Shooting Exercise 01
➼ Framing Shooting Exercise 02
➼ Production Shooting Exercise
4. Feedback
5. Reflection
LECTURES
Lecture 1: Shot Size & Camera Angle & Composition
What is a Camera Shot?
A composed series of frames that are shot uninterrupted from the moment the camera starts rolling until it stops. Camera shots are an essential aspect of filmmaking and video production, as combining different types of shots, angles and camera movements, the filmmakers are able to emphasis specific emotions, ideas, and movement for sense.

1. Shot Size
Shot Size is the amount of space that is visible within a single shot or frame.
Types of Camera Shot Sizes:
- Extreme Wide Shot (EWS/ELS): The subject looks smaller compared to the background.
- Wide Shot/Long Shot (WS/LS): Shows the whole subject with a large background, closer than an EWS.
- Full Shot (FS): Full subject body.
- Medium Wide Shot (MWS): Shows the subject from about the knees up.
- Cowboy Shot (CS): Shows the subject from about mid-thigh up.
- Medium Shot (MS): Shows the subject from the waist up, focusing more on them while still showing some background.
- Medium Close Up Shot (MCU): Shows the subject from the chest up.
- Close Up Shot (CU): Fills the frame with part of the subject. If your subject is a person, usually the face.
- Extreme Close Up Shot (ECU): Focuses tightly on a small detail, like eyes or mouth.
- Establishing Shot: A shot at the start that shows the location of the scene.

2. Camera Shot Framing
The art and science of placing subjects in your shots. It is all about composition - rather than pointing the camera at the subject, you need to compose an image.
Types of Camera Shot Framing:
- Single Shot: A single shot shows one subject at a time.
- Two Shot: Frames two characters in the same shot.
- Three Shot: Shows three characters in the frame.
- Over-the-Shoulder Shot (OTS): Shows the subject from behind another character's shoulder, often used in conversation.
- Point-of-View Shot (POV): Camera is placed near a character's hip in the foreground, with the main subject in focus.

3. Camera Angles
It is used to specify the locations where the camera is placed to take a shot. The position of the camera in relation to the subjects can affect the way the viewer perceives the scene. Multiple camera angles can amplify the cinematic effect and the emotions.
Types of Camera Angles:
- Eye Level Shot: Neutral, natural view.
- Low Angle Shot: Shot from a low angle looking up at the subject, making them look powerful.
- High Angel Shot: Camera looks down at the subject, making them see small/weak.
- Hip Level Shot: Roughly waist-high/hip level shot.
- Knee Level Shot: Camera is low, around knee level. Making the subject look stronger or more dominant.
- Ground Level Shot: Camera is at ground level with the subject, showing what is happening around their feet.
- Shoulder Level Shot: Camera is at shoulder height, making the subject look shorter than reality.
- Dutch Angle/Dutch Tilt Shot: Camera is tilted to one side, creating a sense of disorientation.
- Bird's Eye View Shot/ Overhead Shot: Shot from high above, looking down at the subject and surroundings. showing scale and movement.
- Aerial Shot: A high shot from above that shows a wide area of scenery (taken by drone/helicopter).
4. Composition & Framing
Composition refers to the way elements of a scene are arranged in a camera frame. Shot composition refers to the arrangement of visual elements to convey an intended message.
Rules of Shot Composition in Film:
- The Rule of Thirds: 3x3, one of the most common framing techniques in film or photography, showing a character's position in relation to the scene.
- Balance & Symmetry: Breaking the Rule of Thirds, this puts the subject at the center, which can create tension or garner more emotion.
- Leading Lines: Directs viewer's eyes to the subject.
- Eye-Level Framing: Positions the audience at eye-level with the character, planting the idea that they are equal with the character.
5. Depth of Field & Focus
Dept of Field describes the size of the area in your image where objects appear acceptably sharp. That area is called the field, and the size of that area is the depth of that field.
Types of Camera Focus:
- Rack Focus: When the focus changes during a shot, either slightly or greater. It is more noticeable when the focus is shallow.
- Shallow Focus: Sharp subject with a blurred background to emphasize emotion.
- Deep Focus: The elements both near and far from the camera are in focus, keep everything sharp.

Lecture 2: Three-Act Story Structure
What is the Three-Act Structure?
The three-act structure is a narrative model that divides a story into three parts: Act One, Act Two, and Act Three — also known as the beginning, middle, and end. Not every story needs to follow the three-act structure, that’s why it’s important to understand how it works. It is not a strict formula, but a helpful guide.
1. Act I: Setup
The setup introduces the characters, their story world, and the inciting incident, which kickstarts the story. It usually takes up the first 20–30 minutes of a film.
2. Act II: Confrontation/Build
The middle of the story raises the stakes and keeps the audience engaged. It is the main part of the story and often leads to the worst possible situation for the main character.
3. Act III: Resolution/Payoff
The ending should bring some form of catharsis or resolution, whether it is happy or sad. It offers a moment of release, either of relief or despair.

Lecture 3: Storyboard
What is a Storyboard?
A storyboard is a visual representation of a film sequence and breaks down the action into individual panels. It is a series off ordered drawings, with camera direction, dialogue, or other pertinent details. It sketches out how a video will unfold, shot by shot.
Here is a website that can be used to create storyboard film scenes: Milanote
Storyboard:
- Drawings, Sketches, Reference Images or Photographs to represent each frame.
- A description of the shot ー any relevant information on the action, dialogue, or composition.
- Shot specs ー shot size, lens length, two-shot, etc.
- Arrows to indicate camera and/or character movement or how each shot connects to the next.


Stages of Film Production:
1. Development
- This is where it all begins. A producer or screenwriter begins with an idea and develops it into a film.
- The development stage is usually overseen by a producer, who is responsible for assembling the key elements needed to move the project forward, including the creative team, financing, and an initial production schedule.
2. Pre-production
- It includes all the preparation necessary before filming begins. In other words, everything that takes place after financing is secured and before production starts.
- Three major things happen during this stage: Budgeting, Getting the Team Together, Pre-visualizing.
3. Production
- This is when filming starts and the cameras begin recording the movie.
4. Post-production
- This stage refers to all the work that is done after footage is captured to finish the film.
- Most people think of post-production as just editing, and while editing is a key part of it, there are many other important steps involved in this stage, such as picture editing, sound editing, and adding extra visual effects.
5. Distribution
- Distribution as the stage where the finished film is made available to audiences and promoted so people can watch it.

The Roles of The Production Team
1. Producer
- The leader of the film team and manages the whole production from start to finish.
- Develop the idea, finalize the script, arrange financing, and oversee the production team that makes the film.
- Coordinates the filmmaking process to ensure that everyone involved in the project is working on schedule and on budget.
2. Director
- The director is primarily responsible for overseeing the filming and assembly of a movie.
3. Screenwriter
- The screenwriter does more than write dialogue, they also structure the story and shape the sequence of events, so scenes flow logically and keep the audience engaged.
4. Production Designer
- The production designer is the first artist to translate the script into visual form.
- He or she creates a series of storyboards that serve as the film's first draft.
5. Art Director
- The art director is responsible for the film’s settings, including the buildings, landscapes, and interiors that create the physical world for the characters.
- Responsible for acquiring props, decorating sets, and making the setting believable.
- Costumes convey a great deal about the film's time period and the characters who wear them, including their economic statues, occupation and attitude toward themselves.
7. Cinematographer
- The director of photographer, or DP, is responsible for capturing the script on film or video. The DP must pay attention to lighting and the camera's technical capabilities.
8. Editor
- Shortly after filming begins, the editor starts organizing the footage and assembling individual shots into a continuous sequence.
- The editor's choices about which shots to use, and the order in which to place them, have a profound effect on the appearance of the final film.
9. Actors
- Responsible for showing the characters in a film, actors work closely with the director and cinematographer.
10. Music Supervisor
- Selecting the right music for a film helps strengthen the story and make it more powerful for the audience.
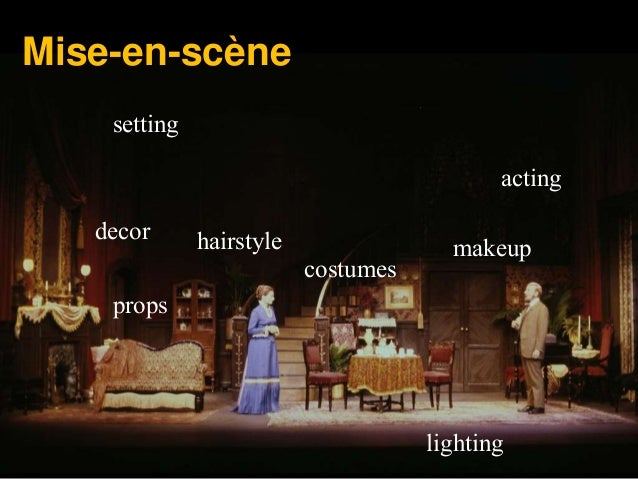
Mise en Scène is a French term meaning "placing on stage/setting the stage." In theater, film, and visual storytelling, it refers to the overall visual arrangement and presentation of a scene. It includes everything shown on stage or in the frame and how these elements are arranged to create meaning, emotion, and story.
Key Components of Mise en Scène:
1. Setting and Location
- Physical Space: The setting where the action happens, such as a real place like a living room or a symbolic space.
- Time Period: The era in which the story is set, influencing costumes, props, and set design.
2. Props and Objects
- Items used by characters or present in the scene that can symbolize themes, indicate character traits, or advance the plot.

3. Costume and Makeup
- Clothing and makeup that reflect a character's personality, social status, occupation, or psychological state.

4. Lighting
- The use of light and shadow to create mood, focus attention, and highlight important elements. For example, strong contrast lighting can create a dramatic or tense feeling.
5. Composition and Framing
- How elements are placed within the frame or on stage, including camera angles and actor positions. This shapes how the audience sees relationships and power between characters.

6. Performance and Acting
- The actors' physical movements, facial expressions, and interactions contribute significantly to the mise en scène, conveying emotions and subtext.
7. Color Palette
- The selection of colors used in costumes, sets, and lighting can evoke specific emotions or symbolize thematic elements.
8. Spatial Relationships
- The distance and arrangement between characters and objects, which can indicate intimacy, conflict, or hierarchy.

Lecture 6: Color Theory, Color Correction V.S. Color Grading
What is Color Theory?
Color Theory:
- A scientific principle that explains how color hues and saturations are created.
- A creative discipline that examines how color is used to achieve emotional effect in visual art.
Types of Color Theory:
- Color Wheel
- Color Context
- Color Harmony
What is a Color Wheel?
Color wheels have been used for hundreds of years to represent and organize ranges of color.
Color Schemes
- Monochrome: It utilizes varying tones of a single color, typically grey.
- Analogous: It utilizes colors that are adjacent to each other on the color wheel.
- Complementary: It utilizes colors that are opposite each other on the color wheel.
- Triadic Color: It utilizes colors that are evenly spaced on the color wheel, forming an equilateral triangle
- Tetradic Color: It utilizes colors that are evenly spaced on the color wheel, forming a rectangle.

Color Correction V.S. Color Grading
Key terms that build the basics of color:
- Hue: The color you see on screen, such as red or blue.
- Saturation: How much hue is in a color or how intense that hue looks, from muted to vivid.
- Brightness or Luminance: How light or dark the image is overall.
- Tint: Subtle color grading across the image, often caused by lighting conditions or camera settings.
- Color Space: The range of colors your footage captures and displays.
What is Color Correction?
Color correction is a technical cleanup step in post-production. During this process, editors adjust exposure, white balance, and saturation to ensure the video looks natural and consistent across all shots.
What is Color Grading?
Color grading builds on the corrected image to create a deliberate visual style. Once the footage appears accurate, grading tools adjust hues, contrast, and saturation to establish a specific mood or visual identity.
5 Differences Between Color Correction and Color Grading
1. Order: Prep vs. Polish
Color Correction happens in post-production after the edit is complete. It focuses on technical adjustments such as matching cameras, correcting white balance, and balancing exposure so that all clips look consistent and belong to the same scene.
Color Grading enhances the color correction process by adding a creative layer to the footage. After the image is technically balanced, grading is used to shape the mood and visual style, giving the final video a specific tone and atmosphere.
2. Mindset: Objective vs. Creative
Color Correction is more technical, and objective compared to color grading. Instead of focusing on whether a shot is purely accurate, color grading allows you to define how it should look and feel.
3. Workflow: Clip by clip vs. Global
Color Correction is typically done on a clip-by-clip basis, as each shot may have its own specific issues.
Color Grading works on a broader scale. Once everything is balanced, a LUT or stylized curve can be applied using an adjustment layer or nodes to cover an entire scene or sequence. This ensures a consistent creative look across all footage without needing to rebuild the style for each clip.
4. Tools: Scopes vs. Style Controls
Color Correction uses scopes and properly sets monitors to check and adjust the image. Color Grading uses the same tools and readings but focuses more on creative choices.
5. Visibility: Unnoticed vs. Signature
Good color correction should not be noticeable. Most importantly, it helps viewers focus on the content rather than react to inconsistencies on screen.
Color Grading can become part of your signature. Over time, that style becomes part of your recognizable brand identity the moment your videos appear on the screen.

Lecture 7:
INSTRUCTIONS
PROCESS WORK
Editing Exercise 01
We have been assigned to complete the "Mints" and "Doritos" editing exercise and upload it to our Blogger and Google Drive.
We completed the first editing exercise in class by following our lecturer’s instructions. He guided us step by step in detail. First, we created a new Premiere Pro project and imported the downloaded footage into it. Next, we arranged the shots on the timeline in the correct order. Finally, we set the mark in and mark out points and exported the project! The mark in indicates the starting point, while the mark out indicates the ending point.
Download Footage: https://drive.google.com/drive/folders/1u9n6cD3

Final Outcome:
The final video after combining the clips is shown below!
Editing Exercise 02
In this exercise, the clips were not labeled in order, so we had to determine the correct sequence ourselves. We first imported the downloaded footage and then arranged it on the timeline in the proper order. Once everything was in place, we were ready to export the final video.
Download Footage: https://drive.google.com/drive/folders/1u9n6cD3

Final Outcome:
Below shows the final video after combining in the right order!
Weekly Tasks ✦ Week 01
For this week’s task, we were asked to watch Zach King’s videos/stop-motion shorts. We were required to shortlist 3 videos/shorts and explain the reasons for our choices, such as their style, art direction, character design, and visual effects.
Below are 3 selected videos by Zack King:
1. "Stranded 2" - Zack King Pirate Short Film
YouTube Link: https://youtu.be/CKZ_4W70YZI?si=vFYq8kRrnR9WE_Wp
Reasons for Choosing:
Style:
This short film embraces a cinematic style inspired by adventure films like Pirates of the Caribbean and Indiana Jones, enhancing Zach King's usual content to high production value film. I found out that it uses Blackmagic cameras and Anamorphic lenses, which contribute to a rich, textured visual style and a color palette inspired by mid-2000s adventure films.
Visual Effects:
Zack King blends the real footage with digital effects very smoothly. The effects feel natural and believable, which keeps me focused on the story instead of the editing. I feel like I am watching a movie rather than a short film. The scene where the hook touches someone or something and turns it into gold is a special effect, and it is done very smoothly.
Transitions:
The transitions stand out because they are creatively part of the action. Instead of simple cuts, objects, movements, or camera changes smoothly connect one scene to another. This makes the film feel continuous and flowing, more like a movie than separate clips.
2. I Barely Survived a Dragon
YouTube Link: https://youtu.be/LB0ZugUEa1Q?si=kBzrk5G8Qh1YKAhh
Reasons for Choosing:
Style:
This video showcases Zach's magic and humor, this film seems to be a collaboration with the game Call of Dragons, telling the story of Zach and his friend accidentally enter a magical realm and are pursued by a dragon.
Art Direction:
The dragon and setting follow a modern fantasy design, with detailed props and convincing magical effects. The interactions with the dragon feel realistic, creating the illusion that fantasy exists in the real world.


.jpg)


FEEDBACK
Week 01:
Mr. Kannan explained the module brief very clearly, making it easy to understand. This week, we learned how to turn several pieces of footage into a complete video, organize the clips in the correct order, and export the final product in H.264 (MP4) format, which is widely used across multiple platforms. In addition, I learned that one second of video can consist of different frame rates, such as 25 fps or 29.97 fps, which create different visual effects.
Week 02:
This week, we completed a shooting exercise based on a given scene. My teammates and I finished filming and submitted it to Mr. Kannan for review and feedback. He suggested that adding three more shots from different angles could improve the overall video. He also mentioned that high angle and low angle shots are the most suitable for this scene. However, he noted that making mistakes is normal as we are still learning.
Week 03:
Week 04:
This week, there was no feedback session as we were working on the editing for Project 1 Exercise 1. We followed Mr. Kannan’s instructions, and he taught us several techniques for editing in Adobe Premiere Pro. Mr. Kannan also provided us with a tutorial video on Microsoft Teams to guide us through the editing process.
Week 05:
This week, we experienced a production shooting practice. Each student was assigned to different positions such as director, producer, actor, lighting crew, and cameraman. I was given the role of actor, and it was quite fun and interesting to act. We also had the opportunity to use and explore many different types of equipment during the shooting.
Mr. Kannan demonstrated different filming techniques and introduced the cameras to us during the production shooting practice. My group was very united and cooperative, so we managed to complete the shooting very quickly. In addition, Mr. Kannan briefly explained what we will be doing in the coming week.
Week 06:
We are working on Project 2 Exercise 2, and the feedback is written in this blog!
Week 07:
This week was a public holiday, so there were no classes and no feedback was given.
Week 08:
REFLECTION
Experience
After several exercises, I gained experience in different video editing skills. It was my first time using Adobe Premiere Pro to edit footage and audio, and I found the process enjoyable. Besides learning editing techniques, we also learned about various camera angles and how important they are in video production. The position and angle of the camera can greatly affect the overall outcome of a video.
Before this, I had never paid much attention to camera angles, but now I am more aware of them and often think about how they are used in films and videos. Among all the exercises, the shooting task was the most challenging because we had to consider many factors, such as lighting, audio, and camera placement. Producing a video is not as easy as it may seem, as a lot of effort and planning take place behind the scenes.
Lighting may seem like a simple aspect of filming, but I learned that it plays a very important role. The lights must be placed in the correct positions to achieve the desired effect. Otherwise, the footage may appear too dark or overexposed, which can affect the overall quality of the video.
Not only was the shooting process challenging, but post-production was also quite challenging. Video editing requires a lot of attention to detail, as even small adjustments can make a big difference in the final outcome. Despite the challenges, I especially enjoyed the editing process because it was interesting and rewarding to see how different clips, audio, and effects could come together to create a complete video!
Observations
In all the exercises we completed, I realized that video production and sound design are not as easy as they seem. There are many details that need to be carefully considered, and even a small mistake can affect the overall viewing experience of the video.
When we pay attention to every detail, we can see that each shot and scene is carefully planned and prepared. Not only is pre-production important, but post-production also plays a significant role in creating a successful video. Every stage contributes to the final outcome.
During the shooting exercise, I observed that there are many factors that need to be considered. We cannot simply turn on the camera and record whatever we see. Instead, we need to ensure that the camera settings, angles, and placements are properly adjusted to capture the shots we want. Through this exercise, I learned that patience and teamwork are essential in video production. Only by working together and being patient throughout the process can we create a good production.
Findings
Throughout these exercises, I gained a deeper understanding of the effort required to produce a video. I discovered that every decision, from camera placement to editing techniques, can influence the final result. The exercises also helped me appreciate the importance of planning and coordination before filming begins. In addition, I learned that producing a quality video requires both technical skills and creativity. Overall, this experience gave me a better appreciation of the work involved behind the scenes and improved my confidence in video production and editing.
Another finding from these exercises is that creating a successful video requires continuous testing and improvement. Many scenes may need to be retaken, adjusted, or edited multiple times before achieving the desired result. This taught me the importance of being patient, flexible, and open to feedback throughout the production process. By reviewing and refining our work, we were able to improve the overall quality of the final video and create a more engaging viewing experience.
FURTHER
READING
Asynchronous class materials with quizzes:
Week 01
1. The Ultimate Guide to Camera Shots (50+ Types of Shots, Angles, and Techniques)
2. Rules of Shots Composition in Film: A Definitive Guide

The material above covers Camera Shot Size, Camera Framing, Camera Angles, and Composition. I scored 14/15 in the quiz, but I am not sure why the full marks are not showing. In Camera Shot Size, it focuses on using different types of shots in video production. These shots are chosen based on how the story is being told. I have learned about wide shots and close-up shots before, but I was not familiar with many other cameras shot sizes. Now I understand that there are actually many different types used in video production, and they are chosen depending on how the story is told. Camera Framing is the way subjects are placed within a shot. It is closely related to composition, which focuses on how elements are arranged in the frame. I have only seen point-of-view (POV) shots and single shots before, so it is interesting to learn about more types of framing. Camera angles refer to where the camera is positioned when taking a shot. This is important because it affects how the viewer sees a scene. Using different camera angles can create different effects. In my semester 1 module, I practiced taking photos from different angles, such as eye-level and high-angle shots. Composition is the arrangement of visual elements in a frame to communicate a message. It is important not only in photography and video shooting but also in sketching.
Week 02
1. What is The Three Act Structure 一 And Why It Works
2. How to Write Three Act Structure

The materials above highlight the Three-Act Structure, which consists of Setup, Confrontation, and Resolution. I scored full marks 15/15 in this quiz, but it now shows 0 again, and I’m not sure why. In Act I, the story introduces the setting and characters, along with an ‘inciting incident’ that kickstarts the main events of the narrative. Act II is the middle of the story, where there is a build-up of progress followed by setbacks for the character. Act III is the resolution of the story, where all storylines come to an end. This is my understanding of the Three-Act Structure. I learned about writing a three-act structure in the Illustration module before. I think it is quite fun to create a story and develop my own characters.
Week 03
1. What is a Storyboard? The Fundamentals to Get You Started
2. How to create a film storyboard in 6 easy steps

The materials above highlight the importance of having a storyboard, which is essentially a visual representation of a film sequence. I got 9 out of 10 questions correct. The question I answered incorrectly was "What can a storyboard help a filmmaker avoid?" I selected "All of the above," as all the options seemed correct. However, the correct answer was "continuity errors." I learned that storyboarding is important during pre-production because it helps show how the story will go through different shots. I also noticed that the more detailed the storyboard is, the easier it is to do during production. Although it was quite easy to understand, it is still an important thing to remember when making a film. A storyboard also plays an important role because it gives a clear plan for how scenes should be put together.
Week 04
1. Stages of Film Production — Overview of the Entire Process
2. The Roles of The Production Team
3. Ultimate Guide to Film Crew Positions (Jobs & Duties Explained)

The week's materials are to highlight The Production Stages and The Production Crew Roles involved in filmmaking. I got 4 out of 5, with one incorrect answer again. The question I got wrong was “Who is responsible for the visual aesthetic of a film?” The correct answer is Cinematographer. After reading the materials, I learned that making a film is much more complex than I thought because it involves five stages: Development, Pre-production, Production, Post-production, and Distribution. Each stage has its own roles, and people involved often handle more than one responsibility within a single stage.
Other than that, I also learned that Production Crews are equally important in filmmaking because there are many elements to consider when making a movie. It was surprising to learn that there are so many different positions and roles involved in making a single movie. As we can see, making a movie is not as simple as it looks on screen. Everyone works hard to make sure the movie is produced well.
Week 05
1. 20 Mise en Scène Elements Every Filmmaker Needs to Know

This week’s material focuses on Mise en Scène, a French term meaning "placing on stage." I got a full score on this quiz. The topic was quite interesting, and Mr. Kannan’s notes were easy to understand. The notes listed 8 key components of mise en scène: Setting and Location, Props and Objects, Costume and Makeup, Lighting, Composition and Framing, Performance and Acting, Color Palette, and Spatial Relationships. Mr. Kannan also provided different videos for each component. Costume and Makeup, as well as Props and Objects, left the deepest impression on me because they play an important role in a scene. I often remember a scene through a character’s props or makeup. The color palette is very important because it can convey meaning to the audience through color. It is powerful, as we can often understand the emotions or mood of a scene just by its color palette. To sum up, I think all the components of mise en scène are important; none can be left out. Every element needs to work together in a scene to make it complete and effective.
Week 07
1. Color Grading vs. Color Correction: 5 Key Differences
2. What is Color Theory ー A Guide for Image Makers

This week’s material focuses on Color Correction and Color Grading in filmmaking. I scored full marks on the quiz, which helped reinforce my understanding of these concepts. I normally use color correction when editing photos, but I learned that it actually involves adjusting elements such as black and white levels, exposure, contrast, and white balance to achieve natural-looking footage that serves as a foundation for further color work. On the other hand, color grading refers to the creative styling of footage, where colors are adjusted to create a specific mood, tone, or visual aesthetic. I also realized that there are two distinct processes: Color Correction and Color Grading. whereas I previously believed there was only Color Correction. After learning this, I think I can better understand the concepts and apply them in my Project 2 movie trailer, where we need to adjust the colors of the footage. I am looking forward to doing so!
Week 08


Comments
Post a Comment